


Nepal’s Three Passes Trek is perhaps the greatest trekking adventure you can have in the Khumbu (Everest) region of Nepal.
Also known as the Three High Passes, this loop trek wraps around Sagarmatha National Park, leading trekkers over the Khumbu passes of Kongma La at 5,550 m (18,209 ft), Cho La at 5,420 m (17,782 ft), and Renjo La at 5,360 m (17,560 ft).
The trek begins via the Everest Base Camp trail from Lukla, which you’ll fly into on a mountain flight from Kathmandu. Most trekking itineraries vary between 16 to 21 days. However, there are also options to start by hiking from Jiri, Phaplu, Shivalaya, or Salleri. Although I’ve driven these roads before to other treks and they’re sketchier than flying, so I suggest flying to Lukla!
Having trekked Everest’s Three Passes independently and revisited the Khumbu multiple times for other Himalayan treks and climbs, including climbing Island Peak and Mera Peak, I’ve compiled and continue to update this helpful guide to assist with your trek planning.
Update 2025: This guide is freshly updated for the 2025 trekking season with revised permit fees, itinerary tips, and latest changes in Lukla flight logistics.
Update: What's New In 2025?
- Guide Requirements: Many sources still claim you need a guide. BUT as of 2025, hiring a guide for the Everest Three Passes Trek is not compulsory. While Nepal’s Tourism Board introduced mandatory guide rules across many trekking regions, the Everest Region (Khumbu) is exempt because the Khumbu Pasang Lhamu Rural Municipality formally rejected the solo trekking ban. So, the decision remains yours but for safety, I recommend first-time trekkers to hire a licensed guide or join a small trekking group.
- Updated Permits & Fees: All trekkers now need a TIMS card (NPR 2,000), along with the Sagarmatha National Park Permit (NPR 3,000) and the Khumbu Rural Municipality Permit (NPR 2,000). These are required for the full Three Passes circuit and the only permits you need (full info below).
- Digital Permit Applications: Nepal switched to a digital system in 2024. You can apply online, but the easiest way (if trekking independently) is still to visit the Tourist Service Centre in Kathmandu (15-minute walk from Thamel). Sagarmatha National Park fees can still be paid on arrival at the Monjo gate, and the Khumbu permit is collected at the entrance checkpoint in Lukla, despite some online sources saying otherwise.
- Flight Logistics (Lukla Access): In spring and autumn, flights to Lukla now operate from Ramechhap (Manthali) Airport, not Kathmandu. This means a 4–5 hour pre-dawn drive from the capital before your flight which is now standard practice in peak trekking seasons.
- Improved Trail Infrastructure: Many teahouses along the route have been renovated. Expect better bedding, more solar-powered lighting and charging points, sanitation upgrades, and in some places, Wi-Fi or phone service for a fee (Starlink is starting to be introduced).
- In my experience, slightly drier monsoons mean more trekkers are attempting summer (June–Aug) treks, although trails can be wet.
")
Three Passes Trek: Quick Details
The Three Passes Trek offers an unparalleled Everest experience and is a much more enjoyable adventure than the now-commercialized Everest Base Camp Trek. The path carves around the Everest expressway into less-traveled alpine regions of the Khumbu, blending breathtaking landscapes with rich and welcoming Sherpa culture. Below are the basic trip details.
- Days: 16-21 days
- Distance: 166 km (varies greatly depending on side trips)
- Starting Point: Lukla via flying to Tenzing-Hillary Airport. Or Jiri, Phaplu, Shivalaya, or Salleri via road (longer trek).
- Total Ascent: 8,500 m+
- Highest Point: 5,643 m (Kala Patthar)
- Difficulty: Moderate - Difficult
- Permits: TIMS Card (NPR 2,000 obtained in Kathmandu or online), the Khumbu Rural Municipality Permit (NPR 2,000 obtained in Lukla) & the Sagarmatha National Park Entry Permit (NPR 3,000 obtained at the Sagarmatha National Park Entry Gate in Monjo).
- Cost: $1,000-$1,200 USD if independent, $2,000-$3,500 with a guide & porter
- Currency: Nepali Rupee (NPR) - cash only outside of Lukla & Namche
- Trekking season: September to November & March to May
- Trekking type: Teahouse trekking. Trekkers sleep and eat meals in local homestays known as "tea houses" in different villages. You do not need to carry a tent or food.
- Meals: Meals are in tea houses with varying menus. The most common meal is dal bhat, a hearty rice & lentil curry with some vegetable sides. Meat is limited.
- What to bring: Three Passes Packing List
Did you know? The word: La or Lha, translates to that of which is "higher" or "above" in Tibetan. This is also the name given to mountain passes, ie the Three Passes of Kongma La, Cho La, and Renjo La.
")
Insurance for Trekking & Climbing in Nepal
Read the fine print– Most travel insurance companies void coverage as soon as you step over 5,000 m. That's why I use and recommend Global Rescue, as the best high-altitude trekking insurance (no altitude caps).
Do I Need a Guide for the Three Passes Trek?
The answer is that currently, hiring a guide to trek to the Everest Base Camp or the Three Passes is not compulsory as of 2025. While the Nepali Tourism Board has rolled out solo trekking restrictions across key trekking regions, the Everest Region (Khumbu) is not included.
This is largely thanks to the Khumbu Pasang Lhamu Rural Municipality (who ultimately control the Everest Region) rejecting the ban on Free Independent Tourists in a press release where they state:
"...it is not mandatory to hire a guide while trekking in the Everest Region, though we strongly suggest doing so, particularly when you plan to explore high altitude areas and mountain passes."
So, for now, this remains a guideline. But, the question remains, do I need a guide or not? Legally, no. Realistically? That depends on your experience. While not as scary as the peddlers in Kathmandu will try to convince you, it is still a serious trek and I would suggest all beginner trekkers hire a guide.
My thoughts: Hiring a guide and a porter is great because it supports the livelihoods of local Sherpa communities. However, many trekkers, including myself, prefer the sense of achievement from independent trekking. I've completed my BMC in India and feel completely confident hiking the Three Passes independently. Beginners may not.
As it should be, the decision remains yours (for now).
")
Booking the Three Passes Trek
Although I trekked the Three Passes without a guide the first time, I've returned to Nepal several times since for other treks and climbs, including the Manaslu Circuit, Mera Peak, and Island Peak with a guide.
Tip: If you're choosing between Manaslu and the classic Everest Base Camp route, read our comparison guide!
These days I do all my trekking and climbing in Nepal through my favorite trekking company Himalayan Masters. The Three Passes over 17 Days costs $2,100 with all inclusions, which is one of the most competitive rates you'll find.
")
Getting Your TIMS Card and Permits
If you're organizing your Three Passes Trek independently, there are three permits you'll need to get: the TIMS card, the Sagarmatha National Park Entry Permit, and the Khumbu Rural Municipality Permit. If you book with a group or guide, this will be arranged for you ahead of time.
| Permit | Fee (NPR) | Approx. USD | Where to Get It | Notes |
|---|---|---|---|---|
| TIMS Card | 2,000 | $16 | Tourist Service Centre, Kathmandu | Required for all treks. Tour operator can arrange it, or get it yourself. |
| Sagarmatha National Park Permit | 3,000 | $25 | Monjo checkpoint or Tourist Service Centre | Fixed price for all national parks. Can also apply online (optional). |
| Khumbu Rural Municipality Permit | 2,000 | $15 | Lukla checkpoint (on arrival) | Paid in person at the gate. Online not required. |
TIMS Card – NPR 2,000
The TIMS (Trekking Information Management System) card is now required for all major treks in Nepal including the Three Passes. It costs NPR 2,000 (~USD $15) for foreign trekkers.
This card is used to record your trekking route and emergency contact info in case of rescue. In my experience I've never been asked for my TIMS card but I've heard some checkpoints may enforce it. Still, it’s officially part of the 2025 permit system so probably a good idea to get it.
Where to get it:
The best place is the Tourist Service Centre in Kathmandu, located about 15 minutes’ walk from Thamel on Pradarshani Marg. It’s open 10 am to 5 pm (closed for lunch 1–2 pm). If you’re not using a tour operator, you can pick up the TIMS card and all other permits here in one go.
")
Sagarmatha National Park Entry Permit – NPR 3,000
Every trekker entering the Everest Region needs this permit. It’s the only national park fee required for the Three Passes, and the price is the same no matter how long you stay.
Cost: NPR 3,000 (~USD $22). And honestly, having trekked all over Nepal, I can say every national park in the country charges the same flat rate, which is pretty damn good value in my opinion.
Where to get it:
While you can apply online, I found it much easier to just pay at the Monjo checkpoint when you arrive. You can also get it at the Tourist Service Centre in Kathmandu if you want it in advance, since if you're doing things independently you'll go there for your TIMS card.
")
Khumbu Rural Municipality Permit – NPR 2,000
This local fee goes directly to the Khumbu Pasang Lhamu Rural Municipality, which manages infrastructure in the region. It's required for anyone entering from Lukla.
Cost: NPR 2,000 (~USD $15).
Where to get it:
You’ll pay this at the checkpoint just outside of Lukla, shortly after you begin your trek. While there are online options I can confirm that you can 100% still pay in person.
")
How to Get to Lukla to Start the Trek
To start the Three Passes Trek, you will need to make your way to Lukla. The most convenient way is to fly directly to the notorious Tenzing-Hillary Airport from Kathmandu or Ramechapp (seasonally dependent).
Although famous for being the world's shortest runways and one of the most dangerous on earth (I witnessed a plane crash here), Lukla is still a very busy airport by Himalayan standards, accommodating dozens of flights per day via a handful of airlines. Plus, recent work and safety improvements have helped a lot.
I recommend booking a flight with Tara Air (Yeti Airlines) due to the higher frequency of flights and since they are the largest operator in Lukla (helpful during frequent delays). I have also flown with Summit Air and Sita without too many issues. You can book these flights directly on the airline's website.
Important: Due to congestion issues at Kathmandu International Airport, the Nepalese government has halted all flights from Kathmandu to Lukla in the peak trekking seasons of April & May, & September and October. Instead, you should book your flight to Lukla departing from the village of Ramechapp (roughly 5 hours via minivan from Kathmandu).
Three Passes Trek Itinerary
Below I've provided a day-by-day rundown of my recommended Three Passes itinerary hiking in an anti-clockwise direction (best for acclimatization). This is the exact plan and route that I took, with optional rest days and side trips including visiting Ama Dablam Base Camp and climbing Chukhung Ri and Gokyo Ri.
Next, I'll provide a detailed day-by-day breakdown of my experience trekking the Three Passes to help you understand what to expect.
Tip: If you want to hike to Lukla from Jiri, I have a suggested itinerary below.
| Day | Time | Altitude |
|---|---|---|
| Day 1: Lukla to Phakding | 3 hrs | -200 m +50 m Sleep: 2,610 m |
| Day 2: Phakding to Namche | 6 hrs | +1,000 m Sleep: 3,450 m |
| Day 3: Acclimatize in Namche | 4 hrs | +450 m -450 m Sleep: 3,450 m |
| Day 4: Namche to Milinggo | 5 hrs | +750 m -450 m Sleep: 3,800 m |
| Day 5: Milinggo to Panboche | 6 hrs | +850 m -670 m Sleep: 3,930 m |
| Day 6: Panboche to Dingboche | 3 hrs | +460 m -30 m Sleep: 4,360 m |
| Day 7: Dingboche to Chhukung | 2 hrs | +405 m Sleep: 4,730 m |
| Day 8: Acclimatize at Chhukung | 4 hrs | +815 m -815 m Sleep: 4,730 m |
| Day 9: Chhukung to Lobuche | 8-9 hrs | +800 m -620 m Sleep: 4,950 m |
| Day 10: Lobuche to Gorak Shep | 8 hrs | +450 m -200 m Sleep: 5,160 m |
| Day 11: Gorak Shep to Lobuche | 6 hrs | +400 m -650 m Sleep: 4,950 m |
| Day 12: Lobuche to Dzonghla | 3 hrs | +120 m -200 m Sleep: 4,830 m |
| Day 13: Dzonghla to Tagnag | 6 hrs | +525 m -650 m Sleep: 4,700 m |
| Day 14: Tagnag to Gokyo | 3 hrs | +150 m Sleep: 4,790 m |
| Day 15: Rest Day in Gokyo | - | Sleep: 4,790 m |
| Day 16: Gokyo to Lumde | 6 hrs | +550 m -650 m Sleep: 4,350 m |
| Day 17: Lumde to Thame | 3 hrs | -530 m Sleep: 3,800 m |
| Day 18: Thame to Namche | 4 hrs | -370 m Sleep: 3,440 m |
| Day 19: Namche to Lukla | 6-7 hrs | -1,200 m Sleep: 2,860 m |
| Day 20: Fly to Kathmandu | - | Celebrate in Kathmandu. |
")
Day 1: Lukla to Phakding
- Trekking Time: 3 hours
- Altitude: 200 m descent 50 m ascent
- Sleeping Altitude: 2,610 m
I recommend getting the earliest flight to Lukla as possible in order to get a good morning hike in and avoid flight delays which often occur due to heavy clouds after midday. Arriving in Lukla is the time when you can hire a porter if you haven't done so yet as there will be several waiting for newly landed passengers.
Upon arriving in Lukla, the journey begins towards the neighboring town of Phakding. This is also the start of the Everest Base Camp route, so it is busy. Don't worry, you'll depart from it in the coming days.
As you pass through the North end of the town, you will see a police checkpoint. Here you will need to register your name and planned route. You will also be directed to a house directly opposite, where you will need to pay a Solukhumbu Entrance Fee. This costs 2,000 rupees.
After registering and leaving Lukla, the trail drops past Kyangma and after about 30 minutes, into Cheplung.
Soon after, you'll see the first views of the Dudh Kosi, which you will then cross twice over huge, hanging metal suspension bridges and great views of high Himalayan peaks, including Kusum Kangru (6,367 m).
")
Continue on the track, following yaks, donkeys and other trekkers on the obvious trail until you reach the village of Phakding (2,160 m), roughly three hours after leaving Lukla.
There are several lodges to choose from in Phakding, my choice was the Trekker's Lodge, which charged 200 rupees per room for two, and 500 rupees for a Dahl Bhat.
Alternative: If you arrive early in Lukla and you feel good, it is possible to continue straight to Namche Bazaar. However, many advise against this due to the sharp elevation gain.
")
Day 2: Phakding to Namche Bazaar
- Trekking Time: 6 hours
- Altitude: 1,000 m ascent 100 m ascent
- Sleeping Altitude: 3,450 m
The second day of the Everest Three High Passes Trek begins with a short descent, following the Dudh Kosi valley through the pine-tree hills with a steep climb to Namche Bazaar, the capital of the Khumbu Region.
Phakding to Monjo
The second day of the Everest Three High Passes Trek begins with a short descent, following the Dudh Kosi valley through the pine-tree hills.
Take the time to appreciate the green surroundings and homely villages as you hike through TokTok, Benkar, and Chumoa. The trail has patches of rhododendron forests and in Spring, blossoming and flowering trees.
It's a short climb into Monjo, which also has several lodges and stores for stocking up on Snickers Bars or hiking snacks.
At the end of the town, the entrance to the Sagarmatha National Park begins. Before you can enter, however, you'll need to pay the entrance fee of 3,000 rupees. Don't worry, this is the last fee that you'll need to pay on the entire trek.
The entrance is marked by a kani, which is a gateway shaped like a Stupa. As you walk through, turn the prayer wheels. This is a moment that really signifies the start of your Everest Three High Passes Trek journey.
")
Monjo to Namche Bazar
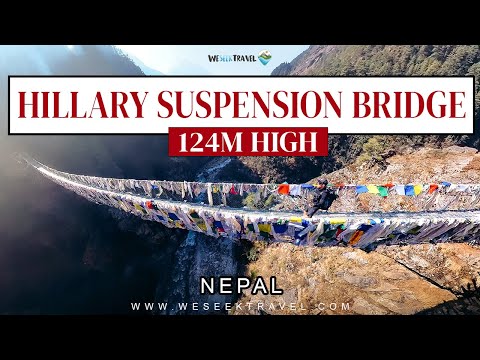
After a steep descent down into the valley, you'll be walking along the rocky river trail. Soon, you'll get your first views of the Edmund Hillary Bridge.
You'll notice that there are two hanging bridges in the valley. The first one is no longer in use by trekkers, so you'll need to take the top bridge. Follow the trail into the forest, which will signify the start of the big climb.
Be mindful of donkeys on this trail. As this is the only trail between Lukla and Namche Bazar, it can get pretty crowded with Everest Base Camp Trekkers and porters. Remember to stay uphill of any yak or donkey when letting them pass you.
Edmond Hillary Bridge
Below is a short video of me crossing the Edmond Hillary Bridge on the way to Namche Bazaar. This bridge is over 460 feet (140 meters) long and rises 410 feet (125 meters) above the Dudh Koshi River
")
First Views of Everest
There is a single rest area on the track between Monjo and Namche Bazar.
It will be on the right of the path, and you'll notice a small toilet block and waste disposal area. From here, you can also catch the first glimpse of Everest before continuing the long climb through the pines into Namche Bazar.
")
Namche Bazar
Just before you enter the town, you will see another police checkpoint. You'll need to show both of your permits that you picked up in Lukla and Monjo. This can be a pretty slow process, especially in peak trekking season.
Shortly after, you'll start hearing the peaceful hammering of rocks and the flowing of water that is Namche's heartbeat.
Namche Bazar is the largest town that you'll visit on the Three High Passes trek, and the biggest in the Khumbu. There are dozens of lodges, bars, cafes, pizzerias and bakeries.
")
If you're lucky enough to be in Namche on a weekend, don't miss the market. Many local Khumbu people make the long walk from surrounding villages every week to trade and gather produce.
In Namche Bazar, it will cost you 1,000 rupees per room in most lodges. I've stayed at quite a few lodges in Namche over the years but can recommend the smaller Sagarmadddtha Lodge on the hill. Here you can pick up a double serving of Dal Bhat for 500 rupees.
Expect to pay slightly more in some of the bigger lodges for food.
")
Day 3: Acclimatization Hikes to Khunde and Khumjung Village
- Trekking Time: 4 hours
- Altitude: 450 m ascent 450 m descent
- Sleeping Altitude: 3,450 m
Most trekkers are encouraged to spend a second night in Namche Bazar to help with acclimatization. Luckily, there are plenty of day trip treks from Namche, so you don’t need to stop walking.
It'll also be a nice change to leave your bag at the lodge and take a smaller day pack out to give your back a bit of a rest.
I'd highly recommend checking out neighboring Khunde and Khumjung, which are two of the largest Sherpa villages in the Khumbu. There is a trail that loops between Namche and these villages, which also offers incredible views of Mt. Everest and Ama Dablam.
")
Khunde
The trail starts just near the Namche Gompa. Begin by taking the steep trail up the mountain and follow it to the small township of Zarok.
There are a few signposts indicating the route to Khunde. You'll also pass an airstrip on the way, which is no longer in operation.
Continue past the large boulders and the windy road down into Khunde.
")
Khumjung Village
After spending some time checking out the local sherpa life in Khunde, you can turn right and navigate the stone-wall maze and through the potato fields onto the next village; Khumjung.
These villages offer an insight into real Sherpa life. All houses here have been reconstructed after the earthquake and look almost identical under Khumbila Peak.
In Khumjung, there is a school, established by Sir Edmund Hillary, along with a post office, and gompa.
")
I'd recommend tackling the hill just beside the Hidden Village Lodge for a little extra acclimatization and incredible views over the villages and mountain giants ahead of the trail.
")
This acclimatization trip was the first and only time I personally experienced signs of AMS. It was nothing more than a lingering headache, which vanished the following day. After speaking to other trekkers, most people begin to feel these symptoms here, due to the huge increase in altitude from Kathmandu to the Sherpa villages in only a few days.
")
Returning to Namche
You can loop back to Namche by taking the southern trail past the post office. There's even another viewpoint a little further down this trail that offers some glimpses of Everest.
Once you reach the airstrip, follow the same steep trail back into Namche Bazar. The next few days will continue on the Everest Base Camp trail until you eventually verge off and begin the Everest Three High Passes trek.
")
Day 4: Namche Bazaar to Milinggo
- Trekking Time: 5 hours
- Altitude: 750 m ascent 450 m descent
- Sleeping Altitude: 3,800 m
After a comfortable day trekking without your pack to the Sherpa villages, it’s time to continue onwards and upwards towards Tengboche, and push an extra hour on this Three Passes itinerary to Milinggo.
While many trekkers tend to stay in Tengboche, I'd recommend the extra hour walk to Milinggo because staying in Milinggo will place you much closer to Panboche, without gaining significant altitude.
Namche Bazaar to Tengboche
There are a few options available for trekkers looking to get to Tengboche from Namche Bazaar. The most direct trail picks up at Chhorkung, just beside the mani boulder.
Follow the trail around the ridge and follow the obvious trail. Eventually, you'll reach Kyangjuma, where you can stop to get some hot water for your porridge or buy some hot tea.
Continue onwards for roughly 15 minutes until you reach a trail crossing known as Sanasa. You'll need to observe signs here and take the rolling trail downhill beside the river towards Tengboche.
Following the trail, trekkers will drop gradually down the valley, each descending step a nuisance knowing you'll have to make up for it further up towards Tengboche. Eventually, you'll reach the bottom of the valley at Phunki Thenga.
")
Steep Climb to Tengboche
Fill up your bottles before crossing the bridge and consider having a quick bite to eat. The next ascent is fairly tiring.
After crossing the suspension bridge, there is another regional checkpoint where you'll need to show your passes. Start the steep, 2-hour ascent up and around the mountain towards Tengboche bypassing the water flowing through the prayer wheels on your right.
The trail is steep but very wide. Depending on the time of year, it'll most likely be a crowded walk as you'll be sharing the path with Everest Base Camp trekkers.
Eventually, you'll reach Tengboche, marked by a kani and some iconic prayer wheels.
")
")
Tengboche Gompa
Tengboche is made famous for being more than just a popular lodging village. It also houses the largest monastery in the entire Khumbu region.
If timing serves you well, it's possible to enjoy a quiet walk through the monastery and even attend the daily prayer ceremonies at 5 am and 3 pm.
Remember to respect Buddhist customs take off your boots (you can wear socks if it's too cold) and refrain from taking photos inside the monastery.
")
Tengboche to Milinggo
If you're set on the Ama Dablam Base camp day trip, then you're best off leaving Tengboche and heading for Milinggo.
Continue downhill through the rhododendron forest, and take care not to slip as this part of the downward trail can get icy in the afternoons.
After 15 minutes of trekking, you'll arrive at Debuche. There are several lodges in this smaller town, which is another popular place for trekkers to stop. It'll also be the same sleeping altitude as Milinggo.
")
Debuche Nunnery
A little further past the town of Debuche is a quaint little nunnery. It's possible to make a quick stop to have a chat and admire the murals and paintings inside.
Milinggo
After only another 15 minutes of trekking along the steep and eroding cliff, you'll reach Milinggo. This is a very small village with only a handful of smaller lodges on the hill-side of the road.
Another good reason to stay in Milinggo over the other popular Everest Base Camp trail lodges is that you'll get a fairer price and most likely a more authentic lodging experience.
")
Day 5: Milinggo to Panboche and Ama Dablam Base Camp
- Trekking Time: 6 hours
- Altitude: 850 m ascent 670 m descent
- Sleeping Altitude: 3,930 m
Trekkers will need to aim to leave Milinggo early in order to get a full acclimatization day in at Panboche and optionally complete the Ama Dablam Base Camp hike.
It's only a short 45-minute to one-hour trek to reach Panboche. Continue along the steep, eroding cliffside, crossing a suspension bridge after roughly 20 minutes.
If you look below, the remains of a destroyed suspension bridge rest at the edge of the river. A concerning reminder of the power of Himalayan earthquakes.
Just past the bridge, there is a powerful scene as the early morning light hits a stupa which is positioned perfectly under the soaring Ama Dablam peak.
")
Panboche
Panboche, also spelled Pangboche, is a small Khumbu town split by an upper and lower village. I'd advise getting straight into a lodge in the lower section of Panboche, grabbing a bite to eat, and dropping off your bags.
")
Ama Dablam Base Camp (Optional)
The Ama Dablam Base Camp trek is a perfect acclimatization hike from Panboche. Normally, trekkers on the Everest Base Camp and Three High Passes treks would stay in Tengboche or neighboring villages for two nights to help with acclimatization.
Choosing to head straight to Panboche and completing this short side trip will mean that you'll get a little more altitude, and not have to stay in the same village for two nights.
However, if you decide you want to hike to Ama Dablam Base Camp, it is highly recommended to take the acclimatization day hikes near Namche Bazaar above.
")
")
The start of Ama Dablam Base Camp trail begins next to Sonam Lodge, at the end of Panboche village. Look out for a sign that points towards the trail that descends to the Dudh Kosi.
At the bottom, you'll cross a bridge and begin a steep climb, passing grazing yaks.
At the beginning of the hill climb, there is no obvious trail. Your goal will be a row of prayer flags at the top of the first hill. Continue upwards on the steep sloping grassy hill until you reach them.
The next section has several sandy patches and is relatively flat. There will be patches where the trail is not so obvious. However, you'll be able to see along the plateau. Continue in the same direction and keep an eye out for points where the trail stands out.
The last section winds up a hill and climbs steeply beside a section of flowing water.
Soon, roughly three hours after leaving Panboche, you'll be at the foot of one of the most picturesque mountains in the world, Ama Dablam.
")
Returning to Panboche
After spending some time resting and admiring Ama Dablam, take the same trail town towards Panboche for a well-deserved serving of Dahl Baht.
")
Day 6: Panboche to Dingboche
- Trekking Time: 3 hours
- Altitude: 460 m ascent 30 m descent
- Sleeping Altitude: 4,360 m
After the big hike to Ama Dablam base camp, you’ll be ready and acclimatized to continue on your Everest Three High Passes itinerary on the short hike to nearby Dingboche.
We continued on past the Ama Dablam base camp trail and followed the main Periche track all the way to Dingboche.
It's a relatively short 3-hour stint. It's also a very gentle climb with long flat sections, making it quite enjoyable and scenic.
After about 2 and a half hours, you'll reach a small bridge. Cross it and continue another thirty minutes until you reach the surprisingly large village of Dingboche.
")
Dingboche
Most trekkers heading straight to Everest Base Camp will usually stay in Periche on the other side. Therefore, Dingboche and the connecting trail will be a refreshing peaceful change to the crowded trails below and marks where you will finally get off the EBC trail and onto the Three Passes route.
Dingboche is also a great place to spend the night. The sun lingers longer in the afternoon and there are some fantastic lodges and bakeries.
Tip: In Dingboche, there is a great lodge and bakery known as Cafe Himalaya. They have great deals whereby if you spend 300 rupees, you can charge your phone or electronics for free. You can also buy yesterday's bakery treats for only 150 rupees, which is a steal in the mountains. Nothing like day-old apple pie warmed in the microwave after a day of trekking in the snow.
")
Acclimatization Hike in Dingboche
Due to the relatively easy and short stroll up to Dingboche, trekkers might want to push on and complete an acclimatization hike in Dingboche.
One great option is to take the steep climb up the Dingboche north ridge to a viewpoint that sits at 5,070 m. This is a pretty big push, so if you're feeling any signs of AMS, then I wouldn't recommend going all the way to the top.
Instead, you can stop at the Nangkartshang Hermitage or the meditation cave of Sange Dorje.
")
You'll notice the trail winding up the mountain towards a group of prayer flags and chortens to the West. It'll take roughly 2.5 hours to reach the top viewpoint, indicated by a tall mast and prayer flags. It's a steep ascent that winds up and around large boulders all the way up the ridge.
From the top, you will have sweeping views of Ama Dablam, Taboche, Cholatse, and Makalu. You'll also get to see the trail that leads all the way to Chhukung, your next destination on the Everest Three Passes trek.
")
")
")
Day 7: Dingboche to Chhukung and Side Trip to Island Peak Base Camp
- Trekking Time: 2 hours
- Altitude: 405 m ascent
- Sleeping Altitude: 4,730 m
Another short trek to Chhukung, where you'll have the optional comfort of dropping your pack and continuing along the Imja Tse (Island Peak) route.
The trail from Dingboche starts on the moraine slope on the southeastern side of the village. Take the upper path and begin the steady ascent through the valley. Roughly halfway, you will notice a small teashop almost in the center of the valley at Bibre.
As you continue, the shifting shape of Ama Dablam continues to surprise as the peaks seem to merge into a mountain almost unrecognizable.
")
")
Take the time to enjoy a tea break or rest your legs before continuing on the wide path to Chhukung. The trail is less obvious in some stretches of this segment, nevertheless, it is a clear heading to the village of Chukhung speckled in the distance.
As long as you continue in roughly the same direction, it's very difficult to get it wrong.
Once you arrive in Chukhung, there are several lodges to drop your bags and get ready for an acclimatization hike before tackling the Kongma La Pass in the coming days.
I would definitely recommend the Khangri Resort, which offers fair prices and will often have several trekkers staying there that you can join for the pass.
")
")
Acclimatization Hike: Imja Tse (Island Peak) Base Camp
Since the trek from Dingboche to Chukung was quite short, you'll have plenty of time to tackle an important acclimatization hike on the same day, as long as you're feeling up to it.
Keep in mind, that many trekkers experience symptoms of AMS at Chukhung. Only attempt further acclimatization if you are feeling healthy and free of symptoms.
The Island Peak Base camp is an excellent side trip that takes roughly six to seven hours for the return trip. The trail is gradual, but sweeps along the moraine of the Lhotse Glacier and passes the beautiful Imja Tsho alpine lakes.
")
For this trip, you will gain an additional 250 m of altitude. However, this gain is quite gradual compared to Chukhung Ri.
For many trekkers, this is one of the most beautiful areas in the Khumbu. Take time to admire the frozen lakes and look back for a breathtaking panorama of your already claimed ground back to Dingboche.
")
")
Day 8: Acclimatization Trek to Chhukung Ri
- Trekking Time: 4 hours
- Altitude: 815 m ascent 815 m descent
- Sleeping Altitude: 4,730 m
After a solid day of trekking, you’ll be rewarded with a very important acclimatization day to climb Chhukung Ri before attempting the Kongma La Pass the following day.
")
Chukhung Ri Trail
The best and most popular side-trip and acclimatization hike from Chukhung is to hike to the summit of Chukhung Ri (5,546 m). The return trip will take approximately four hours and is very steep.
It's best to depart early for the best views and the best chances of reaching the top. Begin by picking up the trail at the Northeastern side of the village, just past the Makalu Lodge.
")
Chukhung Ri Summit
The first segment is rocky, with the trail winding up the start of the hill before leveling off to reveal a steep, almost ski-slope-like path. As the altitude rises quickly, it's important to take your time and take plenty of rest.
The first viewpoint is marked by prayer flags and chortens. From here, you'll have 360-degree views of the valley beyond, including Imja Tse, Ama Dablam, Baruntse, and Makalu.
You'll also get a glimpse of the Kongma La Pass trail on the other side of the valley.
If you're feeling fit and healthy, it's possible to keep trekking up the northern side to the prayer flags indicating the top of the Chukhung Ri.
This segment is a little more difficult and requires some rock scrambling. Keep in mind that the wind tends to howl here, and the cliffs are very steep. Once you reach the top, you'll be at an altitude of 5,546 m, which is higher than the Kongma La.
After soaking in what will undoubtedly be one of the most incredible views in the world, make the much faster but knee-buckling 800-meter descent back to Chukhung.
")
Day 9: The Kongma La (5,545 m) to Lobuche
- Trekking Time: 8-9 hours
- Altitude: 800 m ascent 620 m descent
- Sleeping Altitude: 4,950 m
The first of the Three High Passes and also the longest. The trail is also incomparable to previous segments and is best attempted in a larger group.
Be prepared, the Kongma La Pass is ranked by many Three High Passes trekkers as the most difficult by far.
The trail is also incomparable to previous segments and is best attempted in a larger group. Many independent trekkers are anxious about this pass, ask around your lodge to see if other people are willing to walk together.
")
Starting the Kongma La Pass Trail to Lobuche
Sound advice is to leave at first light from Chukhung, as this will increase your chances of better weather on the trail, and avoid crossing the glacier in the dark.
There are also no facilities or food available on the entirety of the Kongma La Pass. It's important to pack both food and water.
The trail can be difficult to find, however, all lodges will be happy to guide you to the start of the trail, just past the Chukhung Resort on the northwest section of the village.
Follow the visible path up and over the first hill, making sure to keep the distant trail in sight to avoid getting lost. Continue up, around, down, and back up the rolling hillsides until you reach a steep and slippery incline beside the Niyang Khola Valley.
")
Steep Segment
This particular segment is very steep and slippery. Depending on the weather, it may also be difficult to follow a path due to ice and snow cover.
We ensured that we took our time heading up until we reached the top of the bluff, revealing a flatter valley with several lakes.
")
The Kongma La Pass
Continue over the first hill until you have views over the larger lakes. From here, you’ll see the Kongma La visible in the distance where prayer flags flap at the low point in the range.
However, before you gain the pass, you’ll need to get around the frozen lake. If you’re lucky, there may already be footprints in the snow from other guided Three High Pass trekkers. Be careful not to cross the actual ice. Instead, there is a track that wraps around to the right and up a small hill.
After getting passed the lake, you’ll need to scramble up a steep segment of loose scree and boulders before arriving at the top of the Kongma La (5535 M).
")
")
")
The Kongma La Pass View
After approximately 5 hours of trekking, you'll be rewarded with incredible panoramic views of the lakes and glacial landscapes. In the distance, Makalu, the fifth tallest mountain in the world stands tall above the rest.
Looking down to the other side of the pass, you'll see a daunting, slippery descent with dangerously loose scree and boulders. You'll also see a hanging glacier which somehow, is still holding on.
Take your time to rest before attempting the most dangerous and difficult part of the Kongma La Pass– the descent.
")
")
")
The Descent
Meticulous care will need to be taken when descending from the Kongma La Pass down to Lobuche.
This is particularly true in the first section, where steep, loose rocks often slip, creating dangerous landslides and falling rocks. It's best to clear this section quickly and carefully, watching for any signs of falling rocks.
This section can also be very slippery, passing over several sections of flowing or frozen water.
")
After a nail-biting descent, you'll reach a softer and rounder section, where you can catch your breath and take a drink. That being said, you still have plenty of knee-straining decline in front of you.
After finally reaching the bottom of the valley, you'll see the last final that needs to be climbed before reaching the glacier. This section is steep, however, can easily be cleared in 20 minutes. Be careful not to take the more obvious trail to the right.
Instead, follow the fainter trail up the hillside further to your left.
Due to the rapid movement of the Khumbu Glacier, the crossing point has shifted several hundred meters, forcing those who take the right-most trail to switch back along the top of the rugged hillside before making a descent to the glacier crossing point.
")
Crossing the Khumbu Glacier
Now for the final stretch before finally being able to throw down your packs and a well-deserved meal (or two).
Many unprepared trekkers make the dangerous attempt of crossing the glacier by walking directly over the ice. Fortunately, for us, there was a clear section to cross along a stretch of rock. Of course, due to the moving nature of glaciers, this may be easier or more difficult for you.
As we crossed, we listened for the powerful cracks and creaks of rock and ice as the ancient glacier snaked itself down the Himalayan landscape.
Upon reaching the other side of the glacier, it's a short trek up and down several rolling hills before finally making the satisfying descent into the township of Lobuche.
")
")
")
")
Luboche (Village)
What a day. No doubt after clearing the Kongma La Pass, you'll be exhausted and in dire need of hot food and tea. Luckily, Luboche is on the Everest Base Camp trail and therefore has many excellent lodging facilities.
There's even a bakery here, noted as being the highest bakery in the world. They also make incredible cappuccinos that are said to take you down to human altitude for the duration of the cup.
I would highly recommend the Above The Clouds Lodge, located at the back of the village. The owner is extremely helpful and a beautiful person, offering those who have crossed the Kongma La Pass free tea and discounted lodging.
")
Day 10: Lobuche to Gorak Shep and Everest Base Camp
- Trekking Time: 8 hours
- Altitude: 450 m ascent 200 m descent
- Sleeping Altitude: 5,160 m
Legs sore from the Kongma La? Good, you've got another huge day ahead with a long ascent to Gorak Shep and Everest Base Camp! This is optional, but I figure that most people will take the option to see EBC when they are already in Lobuche.
Three High Pass trekkers who are not interested in visiting Mount Everest Base Camp or the Kala Patthar summit can continue to day 13 of this itinerary.
")
Lobuche to Gorak Shep
If you're in peak Himalayan trekking season, then the trek from Lobuche to Gorak Shep will undoubtedly be a crowded one.
You will be sharing the trail with hordes of trekking pole-dragging Everest Base Camp trekkers and their porters as well as endless lines of yaks carrying EBC supplies. This part is particularly crowded as it is the only route to and from Everest Base Camp, meaning double the foot traffic.
")
Either way, wake up early if you're keen on beating the crowds and take the trail at the northern end of the village. This segment follows the crackling Khumbu Glacier along a flat stretch of rocky ground and flowing creeks.
Along the way, you will have excellent views of Mt Pumori, towering immediately ahead. You can also get spectacular views of the Khumbu Glacier, which can move up to one meter per day!
Shortly after the flat section, you'll be faced with two short ascents and then a rocky and windy climb over the Changri Shar Glacier.
This last section of the Lobuche to Gorak Shep trek is fairly narrow, especially considering how much traffic moves along it. Remember to let yaks pass, and stand on the mountain-side, not the cliff-side!
")
Gorak Shep
After roughly two and a half hours of walking, you will have arrived at Gorak Shep. This small village rests in a flat basin beside Kala Patthar and the glacier. It's also the highest altitude that you'll be sleeping at during the entire Three Passes and Everest Base Camp Trek.
There are several lodges at Gorak Shep, most of them charging very steep prices for food and fixed community-style accommodation pricing, similar to most of the other villages.
Depending on the time of year, many lodges could be booked out. It's best to try to find a tea house immediately after arriving. Doing this will allow you to drop your heavy packs and depart straight for Everest Base Camp.
")
Mount Everest Base Camp Trek from Gorak Shep
For many Three Passes and Everest Base Camp Trekkers, Mount Everest Base Camp is the highlight of their trekking experience.
The trail picks up at the opposite side of town that you came in from, leading in the same direction along the glacier. The path is rocky and constantly changing due to the movement of the glacier.
")
You'll also need to allow extra time for ridiculously long trains of moving yaks and tough porters who work as the primary supply network to the camp.
Upon arriving approximately 2 and a half hours from Gorak Shep, you will have reached Everest Base Camp. You'll notice hopeful climbers resting in brightly colored expedition tents and rocks wrapped in Prayer Flags as far as the eyes can see.
What surprised me was that the base camp was built onto the actual glacier, just below the Khumbu Icefall at 5,340 m. You also cannot see Mount Everest from the base camp, due to other closer peaks blocking the view.
Take your time to enjoy the scenery, snap some photos beside the EBC sign, and admire the significance of the base camp for the world's tallest mountain. Remember to respect the privacy of the climbers who pay for the "privilege" of sleeping at base camp in hopes of climbing Everest.
")
")
")
")
")
Returning to Gorak Shep
Once you've filled your camera's memory card, make the return journey back to Gorak Shep, taking the same trail that you came in on.
By now, if you're taking my recommended Three Passes route, you will be well-acclimatized to that altitude at Gorak Shep. In saying that, sleeping above 5,000 m is still not a pleasurable experience.
Many trekkers including myself experience headaches, a bleeding nose, and a restless, cold night's sleep.
Regardless, you'll have a warm meal, hot tea, and the relative comfort of a standing building, which is much more than the early explorers could say.
As easy as it is to complain, remember why you chose to depart on this journey, and think positively, for tomorrow you'll be climbing Kala Patthar to get brilliant views of Everest and the Himalayan giants.
")
Day 11: Gorak Shep to Lobuche via Kala Patthar (5,643 m)
- Trekking Time: 6 hours
- Altitude: 400 m ascent 650 m descent
- Sleeping Altitude: 4,950 m
Arguably one of the best trekking views in Khumbu is best seen at sunrise from Kala Patthar (5,643), which is also the highest point you'll reach on the Three Passes Trek, yes, higher than all of the passes.
The Kala Patthar trail begins on the other side of the sand bowl from Gorak Shep town. You'll notice a sign pointing up the hill towards a rocky outcrop wrapped in Prayer Flags at the top. It's difficult to miss the trail since you'll no doubt already have spotted trekkers walking up and down as you enter Gorak Shep.
For the best chances of a clear view of Everest, remember to depart early. I'd recommend leaving just before sunrise to catch the sun rising over the mountains.
The trek up is fairly steep, however since we were already at an altitude well above 5,000 m, it's a much easier climb than other side-trips including Chukhung Ri a few days prior.
")
")
Kala Patthar View
Once you reach the top, you'll enjoy arguably one of the best mountain views on earth. Take the time to watch the rising sun light up the peaks of Pumori, Lobuche, Nuptse, Lhotse, and of course, Mount Everest.
From here, you'll have the privilege of seeing first-hand the entire South face, which Sir Edmund Hillary and Tenzing Norgay famously summited on May 29th, 1953.
")
")
")
Return to Sleep at Lobuche
After etching the view into your mind, make the descent to Gorak Shep, grab your bags, and enjoy the gentle descent back to Lobuche, where you can rest after a huge few days of trekking.
If you climbed Kala Patthar during sunrise as we did, then even a slow trek down will see hikers reach Lobuche before 12 pm, allowing for a good afternoon of sipping tea and recovering.
Alternative: Fit trekkers who are keen to keep clocking the steps can continue onward on the Three Passes route towards Dzonghla. It's entirely possible to combine both of these segments into one big day of trekking, however, it'll be a long, grueling day.
Day 12: Lobuche to Dzonghla
- Trekking Time: 3 hours
- Altitude: 120 m ascent 200 m descent
- Sleeping Altitude: 4,830 m
The trek from Lobuche to Dzonghla begins by heading back down for a short stint along a short stretch of the EBC trail that you would have missed by going over the Kongma La and continues on a steep ridge to the picturesque Dzonghla.
After a short stretch, you will branch right away from the EBC trail and cross a frozen river. Just ahead you might see expedition tents for climbers attempting the Lobuche summit, depending on the time of the year.
")
")
You will then climb a small hillside and continue along the edge of a steep cliff that wraps around for incredible views of Taboche Peak.
")
Dzonghla is an incredible village resting between the giants. It will be a refreshing change from the hustle of the Everest Base Camp trail.
It is one of my personal favorites, as the sun seems to linger a little longer into the afternoon. The village is also protected from strong wind gusts due to being located in a low bowl and being surrounded by large peaks.
No doubt by now you'll be a little nervous for the next pass. While it can be more slippery than the other passes, Cho La is no more physically demanding than the Kongma La.
In saying that, after a huge few days, a rest would be well earned. If you have the time, or if the weather isn't on your side for the pass, then Dzonghla is a great place to have a rest day before continuing forward on the Three Passes and Everest Base Camp trek.
")
")
")
")
")
Safe Drinking Water Anywhere!
The Grayl GeoPress Purifier Bottle is my favorite travel product. I take it on every hike & use it to filter water all over the world, from hiking trails in Colombia to sketchy taps in India.
Compare how the GeoPress stacks up against the best water bottle filters on the market.
Day 13: Cho La (5,420 m) to Tagnag
- Trekking Time: 6 hours to Tagnag
- Altitude: 525 m ascent 650 m descent
- Sleeping Altitude: 4,700 m
The second of the Three High Passes on this anti-clockwise itinerary. A steep, slippery climb and subsequent descent over one of the most beautiful passes on the trek.
Before you depart from Dzonghla, speak to the lodge owners to see if the Cho La Pass is open for trekking and if there are any other trekkers departing on the same day. If it has been snowing, then finding your way on this Three High Passes segment without a guide can be very difficult.
")
For a Cho La Pass Itinerary, trekkers will have the option of making their way from Dzonghla to Tagnag (Dragnag) or continuing all the way to Gokyo. Since I had plenty of time, I decided to stop at Tagnag.
Keep in mind that if you do decide to walk to Gokyo after the Cho La Pass, you'll have to cross the Ngozumpa Glacier (the largest in the Himalayas) after the Cho La Pass. Finding your way over is a little hard, and I wouldn't recommend attempting it without a guide unless you have plenty of remaining light.
For this itinerary, I'll detail my Cho La Pass itinerary from Dzhongla to Tagnag, since this is how I completed this segment.
Do I need microspikes for the Cho La Pass? The Cho La Pass can get very icy. If there was a segment where they would come in useful, this would have been it. The couple I was trekking with had them, which made walking on ice much easier. In saying that, I didn't have any major problems without them. The choice is yours.
")
Dzonghla to the Cho La Pass
After organizing a packed lunch with your lodge, ask the owners to show you the beginning of the track to the Cho La Pass. From here, it's a fairly easy and gradual ascent that winds up the valley and crosses a few small rivers.
There had been some heavy snow when I crossed the Cho La Pass, which made finding the track easy by following the footsteps of other trekkers.
")
If you look behind your back towards Dzonghla, you'll see a magical scene of Ama Dablam positioned in a perfect panorama between the surrounding peaks.
")
")
There is a clear view of the Cho La Pass from about halfway. You'll see it as the low point between the mountains. Just continue following the worn-in path until you reach a steep, rocky climb. Expect to reach the pass after approximately three and a half hours of trekking.
")
")
The Cho La Pass (5,420 m)
This first steep section of rocky and ice should be fairly easy to climb, with some light scrambling in segments. After about 20 minutes, you'll reach the top - a wide, snowy basin that makes for a perfect place to catch your breath.
Continue on, following the path along the ridge that rolls past the edge of the Cho La Glacier. Along the path, you'll see huge boulders resting atop blocks of ice. It's a humbling thought to imagine how long they've sat there, still.
")
Soon, you'll see a rock wall with a faint glimmer of prayer flags in the distance. From here, it's only a short climb up the icy, black rock wall until you gain the Cho La Pass.
")
")
")
Cho La to Tagnag
Lay down your pack and enjoy a brief rest with the satisfaction that you've now climbed two out of the Three High Passes! Still, don't get too comfortable. The hardest part of the Cho La Pass trek is still ahead of you.
The loose rock trail leading down from the Cho La Pass is infamous for being slippery, icy, and steep. Without crampons or microspikes, you'll probably slip and slide a few times, so take care as you descend.
When you reach the bottom, look back at the pass and count your blessings that you chose to tackle the Three High Passes in an anti-clockwise direction! The rest of the trek to Tagnag is much easier, but it can be difficult to find the path.
Expect roughly 2.5 hours from the base of the rockfall.
You'll have to cross a boulder field, looking for stone cairns that mark the way. After this, there are a few small hills and a breeze descent along a beautiful river to the small Gokyo Valley township of Tagnag.
There are a few lodges here, take your pick and throw down a warm Dal Baht to celebrate.
")
")
Day 14: Tagnag to Gokyo & Gokyo Ri (5,357 m)
- Trekking Time: 3 hours to Gokyo
- Altitude: 150 m ascent
- Sleeping Altitude: 4,790 m
With heavy legs, push on over the Ngozumpa Glacier to Gokyo and then climb Gokyo Ri for the best views of the entire Three Passes route.
Legs heavy after crossing the Cho La Pass the previous day, we woke up at first light to get a head start. This first section isn't particularly difficult, but you'll need to cross the Ngozumpa Glacier, which constantly moves and changes.
")
The trail from Tagnag isn't immediately obvious either. But, if you walk to the end of the town, you'll see the trail leading right to the very base of the mountain. We followed porters and footprints in the snow that led up the moraine wall for our first glimpses of the Ngozumpa Glacier.
If you don't have footprints or porters to follow, keep an eye out for stone cairns that mark the zigzagging path down and across the glacier.
")
")
")
After crossing, there's a section where you walk alongside a steep rockfall.
BEWARE this is a dangerous section with huge rocks rolling down and smashing into the glacier. We even had to make a run for it at one stage to avoid getting hit. You'll know what I mean when you see it.
After narrowly escaping the rockfall, you'll climb a small hill where you'll get your first glimpse of Khumbu's most beautiful village: Gokyo. It's a lot larger than most of the other villages you would have past on the way and the unofficial capital of the North.
")
Gokyo and the Gokyo Lakes
The alpine lakes of Gokyo have an incredible turquoise tint which contrasts beautifully with the white hills and soaring peaks.
Unfortunately, it was still a little early in the season when I arrived in Gokyo, and the majority of the lake was still frozen over. Still, making the wobbling descent down into Gokyo was an incredible moment.
In terms of lodging, I'd recommend the Namaste Lodge, which offers large comfortable rooms for only 200 NPR per night.
")
Gokyo Ri (Side Trip)
Originally, our post-Cho La Pass itinerary was to rest in Gokyo once we crossed the glacier. However, we had perfect weather conditions when we arrived, and it was still very early.
")
The trail zig-zagging up Gokyo Ri is immediately obvious from the lake. After crossing a trickling river, begin the tiring and steep walk up the hill.
After roughly 3 hours, you'll reach the rocky summit, wrapped in prayer flags. From here, you have panoramic views of the Ngozumpa Glacier, the Gokyo Valley, Mt Everest, Lhotse, Makalu, and other huge unnamed peaks in Tibet.
In good weather and on a clear day, you'll unlikely be in a rush to head down. The views are incredible. We sat for hours in attempts to edge every detail into a panoramic memory I knew I'd cherish forever.
The walk down from Gokyo Ri is much easier and quicker than the ascent but a bit of a leg burner.
")
Day 15: Rest Day
Go on, you've earned it. Explore side trips like the Gokyo Lakes and Scoundrel's Viewpoint. Or, just kick back in Gokyo's picturesque bakeries.
Gokyo is a special place.
")
Day 16: Renjo La Pass (5,345 m) to Lumde
- Trekking Time: 6 hours
- Altitude: 550 m ascent 650 m descent
- Sleeping Altitude: 4,350 m
After climbing Gokyo Ri, and spending an optional day or two recovering in beautiful Gokyo, it’s finally time to tackle the final pass of the Three High Passes trek; the Renjo La.
In all honesty, this pass is the easiest of the lot, assuming that you are following this guide in an anti-clockwise direction. However, this is still a 5,345 m alpine pass in the highest mountain range in the world, and completing it is still an incredibly fulfilling experience.
Note: If you're hiking this clockwise, then the Renjo La Pass will be your first pass, requiring 1,000 m+ of elevation gain in a single day. While still possible, this is usually not recommended.
")
Gokyo to the Renjo La Pass
Gokyo to the Renjo La Pass
Again, remember to depart early for the best chance of clear conditions on the pass. You can expect around three hours of trekking before gaining Renjo La.
Following the same trail to Gokyo Ri from Gokyo, walk alongside Gokyo Lake, following the flank of Gokyo Ri before climbing steeply to the base of a ridge wall.
The final section is a winding push to the Renjo La pass, which is steep and often piled with snow. The path is fairly clear, especially when carved out of the snow by sherpas and other trekkers.
")
")
Views from the Renjo La
After gaining the pass, you are treated to an awe-inspiring landscape that stretches from Gokyo to the Ngozumpa Glacier to the giant peaks of Nuptse, Lhotse, Cholatse, Makalu and of course, Everest.
The Cho La is also visible from the Renjo La pass, serving as a humbling reminder of the vast, beautiful, yet unforgiving terrain traversed on the journey so far.
")
")
")
The Descent to Lumde (Lungden)
After wiping away the tears of victory, it's time to throw the rucksack back on and muster the energy required to descend back to Lukla to complete the Three High Passes Trek.
Of course, the vast distance that makes up this last section is usually covered over 2-4 days. The good news is that most of the trekking from this point on is a gentle decline. You will undoubtedly feel revitalized by the change in slope, combined with the benefits of increasingly denser oxygen as you descend.
")
But first, you will need to descend the sheer, icy route of the Renjo La. This section can get very slippery, so if you have microspikes or crampons, now would be a great time to use them.
This path is easy to find, however again, is very slippery. Great care should be taken to avoid falling.
Soon after, you will reach the Angladumba Tso, which is a small alpine lake below the pass. From here, you'll feel like a superhero as you cruise down the wide, rolling path to another lake; Relama Tsho, before turning into the Renjo Khola Valley.
")
The final section before reaching Lumde is a steep descent down into the valley, switching back and forth beside large rocky outcrops.
There are several lodges in Lumde to choose from, so take a pick. Alternatively, some trekkers choose to carry on further, even to Thame if you have the energy. Feeling fresh and rejuvenized (perhaps due to the much-missed oxygen), we continued to the next village; Murulung. We stayed at the Riverside Lodge, whose very welcoming owner is the son of a sherpa man who had summitted Everest on several different occasions.
Day 17: Lumde to Thame
- Trekking Time: 3 hours
- Altitude: 530 m descent
- Sleeping Altitude: 3,800 m
With the Three High Passes behind you, take the rewarding decline back down to Thame or Namche through the Bhote Koshi Valley and into the Langmuche Khola Valley.
Since this entire section is essentially downhill, you can choose your trekking itinerary freely without much risk of AMS, depending on your energy.
Continuing down the Bhote Koshi Valley and into the Langmuche Khola Valley, the track connects several small villages before reaching Thame. Highlights include Thambuteng and Thame Teng.
It is possible to stay in most of these small villages. However, most trekkers choose to spend a night at Thame. You can also continue all the way to Namche as it is mostly downhill and easy trekking at much lower altitudes.
")
")
Day 18: Thame to Namche Bazaar
- Trekking Time: 4 hours
- Altitude: 370 m descent
- Sleeping Altitude: 3,440 m
A continued journey back to Namche Bazaar following a regularly commuted trail through mountain villages and for the first time in weeks; forests.
The descent from Thame to Namche is very peaceful, and I'm sure that you will notice how sensitive your senses are in response to the prolonged deprivation of the sights and smells of plants and trees.
The smell of forest flowers and pine needles beneath your boots is incredibly rewarding and fulfilling, and it's as if more life returns to the track with every kilometer you descend.
You will have no trouble finding the route back to Namche Bazaar, as villagers make the commute daily to visit the market and conduct other necessary business in the unofficial capital of the Khumbu.
If you stayed at Thame the day prior, then spending a final night in Namche is a great option. Alternatively, you can continue on the same route back down to Phakding or even Lukla.
")
Day 19: Namche Bazaar to Lukla
- Trekking Time: 6-7 hours
- Altitude: 1200 m descent
- Sleeping Altitude: 2,860 m (Lukla)
The familiar trail back to Lukla is a fulfilling and much lighter experience than the initial descent. You'll follow the same track that you came up on day 2 of this Three Passes Trek itinerary.
")
")
Day 20: Fly to Kathmandu
Arriving back in Lukla is an overwhelming experience. After having been welcomed into the sherpa culture and humble mindset and having treated your eyes to the most powerful mountain peaks in the world for nearly 20 days, it's easy to feel a little bit emotional.
As you sit in beautiful Lukla, perhaps sipping on a hot coffee as you wait for your return flight, take the moment to really appreciate where you are and where you have been. The Three Passes trek was truly one of the most beautiful and rewarding experiences of my life so far, and one that I'm sure after having completed, you'll share with me a deep sense of pride and admiration.
Notes following my first trip to Khumbu in 2019: The truth is, as I finish this guide a few months after leaving, I feel an overwhelming urge to return to those mountains and to be a part of that simple, humbling life once more. So, as you take that final sip, no doubt longing for the comforts to come, dare to push those thoughts to the back of your mind one final time, and truly live those final moments.
")
")
Where to Stay Before and After the Three Passes Trek
The trekking and tourist hub in Kathmandu is called Thamel. This is where you will find all of the best trekking shops, hostels, restaurants, bars, and hotels in Kathmandu.
If you're planning a trek in the Himalayas, you'll want to find a hotel or hostel that allows you to leave your luggage there until you return. Read my guide to Kathmandu's best hotels, or take a pick from the three best accommodation options below that offer this service.
")
1. Aloft Kathmandu Luxury
Overlooking the city from the heart of Thamel, this is "the place" where climbers including myself stay before big expeditions. It's a luxury pick with epic amenities like a gym, rooftop pool, and an EPIC buffet breakfast.
")
2. Flock Hostel Budget
Best backpacker hostel in Thamel with very clean dorms with curtains & private rooms with excellent views. Amazing on-site cafe & restaurant serving delicious coffees & international meals.
")
3. Nirvana Boutique Hotel Mid-Range
A peaceful boutique hotel to escape the hustle & bustle. Best mid-range pick with a 9.7/10 rating on Booking.com.
")
Teahouses: Accommodation on the Three Passes Trek
One of the great things about trekking in the Nepal Himalayas is that there is comfortable accommodation on offer in all villages.
This means, that on the Three Passes Trek, as well as most other popular treks in Nepal like EBC or the Manaslu Circuit, hikers will stay in Tea Houses– unlike the K2 base camp trek in Pakistan, where you'll sleep in tents.
These tea houses are essentially small lodges, each offering warm food, a bed, and sometimes a warm fire in the evening. The price for a stay in a tea house ranges between 200-500 ($1.50 - $3.85) rupees per night, as long as you buy a meal at the tea house.
")
Optional: Hiking to Lukla From Jiri
While it is possible to hike to Lukla from Jiri and other villages in the foothills, I don't recommend this as it adds significant time to your trek. And, since you have to pay for lodging and food, this works out to be just as expensive as flying directly.
However, if this is something that you want to do, you can follow the below itinerary, which was suggested to me by my trekking guide Sandip.
- Day 01: Kathmandu to Bhandar
- Altitude: 2,190 m / 7,185 ft
- Travel Time: 8-10 hrs drive
- Highlights: Scenic drive alongside Sun Koshi river, picturesque Jiri town, onward to Bhandar.
- Day 2: Bhandar to Sete Town
- Altitude: 2,575 m / 8,448 ft
- Trekking Time: 6-7 hrs
- Route: Descend to Likhu Khola, trek through farms to Kinja, and ascend to Sete.
- Day 3: Sete to Junbesi via Lamjura Pass
- Altitude: Junbesi - 2,670 m / 8,759 ft; Lamjura La Pass - 3,530 m
- Trekking Time: 6-7 hrs
- Highlights: Rhododendron forests, panoramic views from Lamjura Pass, Sherpa village of Junbesi.
- Day 4: Junbesi to Nunthala
- Altitude: 2,220 m / 7,283 ft
- Trekking Time: 6 hrs
- Route: From Junbesi, trek to Salleri, descend to Ringmo Khola, ascend Takshindo La Pass, then to Nunthala.
- Day 5: Nunthala to Bupsa
- Altitude: 2,360 m / 7,742 ft
- Trekking Time: 5-6 hrs
- Highlights: Views of Karyolung, Kusum Kanguru, descent to Dudh Koshi River, trek to Bupsa.
- Day 6: Bupsa to Surkhe
- Altitude: 2,290 m / 7,513 ft
- Trekking Time: 5-6 hrs
- Route: Ascend from Bupsa through forests to Paiya, then trek to Surkhe.
- Day 7: Surkhe to Lukla
- Altitude: Lukla - 2,860 m / 9,383 ft
- Trekking Time: 4-5 hrs
- Route: From Surkhe, trek through the lush landscape and local villages. The path gradually ascends to Chaurikharka, a large Sherpa village, then levels out to Lukla
Once you arrive in Lukla, you can follow the Three Passes Trekking itinerary below.
")
Hiking Clockwise or Anti-Clockwise?
Starting the Three Passes Trek in a clockwise or anti-clockwise direction is perhaps the first question you might have when planning your trekking itinerary.
I highly recommend that this trek should be attempted in an anti-clockwise direction. That is, starting with the Kongma La and finishing with the Renjo La.
Not only will you have a higher chance of clearing the passes when trekking in this direction, but you will largely minimize AMS risk in the first few days. This is because attempting to gain the Renjo La first requires at least 1,000 m of elevation gain to 5,345 m in a single day.
Hiking the Three Passes Trek in an anti-clockwise direction gives plenty of time for acclimatization hikes and allows for more gradual increases in altitude gain.
")
")
How I Stay Connected Off-Grid
I've been using the Garmin InReach Mini satellite communicator for all serious treks and expeditions since 2020.
It lets me send unlimited SMS anywhere on earth and has an emergency SOS feature that could save your life.
Best Time to Attempt the Three Passes Trek
While you can trek in the Himalayas most of the year, two primary climbing seasons offer the best trekking conditions: March to May and September to November.
During the Winter Season, the passes are very icy, and heavy snowfall can interrupt routes. While it could be attempted, the passes would be much more difficult to traverse during winter, with closures common.
During Summer, the risk of avalanches is higher due to the quickly melting ice and snow on the Himalayan peaks.
1. March to May
From March to May, the Khumbu region enjoys Spring climates. This is the most popular season for trekking and expedition climbing. There is little rain during this time, the skies are clearer and the days are warmer. You’ll also be able to see blooming plants and lush rhododendron forests in the lower altitudes.
2. September to November
Another popular season for many Three Passes trekking itineraries is just after the monsoon in September to November. During this period, the clouds are clearing and there the weather is less hot. The landscapes at lower altitudes are also much greener and the weather is typically devoid of storms.
However, during the night it can be a little colder than in the Spring trekking season, so be prepared by bringing an extra thick sleeping bag.
How Much Does it Cost to Hike the Three Passes Trek?
Costs will vary depending on your lodging and meal expectations. I did this trek independently and paid between $800-$1,000 for the entire trek, including accommodation, flights, and food.
However, costs have gone up recently and I would say that you can expect to pay $1,000-$1,200 USD if trekking independently or $2,000-$3,500 with a guide & porter
For the experience, the money is 100% worth it and you might be surprised about just how affordable Khumbu teahouse trekking can be.
Here's a breakdown of my costs for the Three Passes trek when I did it independently.
| Cost | Price | Total |
|---|---|---|
| Return flight to Lukla | $360 USD | $360 |
| Average teahouse bed per night | $6.50 | $130 |
| 2x Meals and trekking snacks daily | $15 | $300 |
| National Park Fees and Permits | $51 | $51 |
")
Three Passes Packing List
Here’s a quick list of gear you’ll need on the trek. I’ve also written a separate, more comprehensive Three Passes packing list to help you plan out everything you need to bring on the trek, so make sure to check that out.
The essentials are:
- 40-60L hiking backpack and a rain cover– good brands include Osprey, Deuter, and Berghaus
- Water Bottle– I swear by water filter bottles like these ones from Grayl since they filter your water, meaning I don’t need to bring water purification tablets
- A layering system consisting of a base thermal layer, a trekking shirt and pants, an insulating layer, down layer, and a hardshell jacket.
- A physical map
- Electronics: Phone, Kindle, battery pack/power bank.
- Good quality, warn-in, trekking boots, and trekking socks
- Sunglasses and a buff
- First Aid Kit
- Microfibre towel, toiletries, and sunscreen
- Headlamp & trekking poles
- Lightweight, warm fleece or cotton sleeping clothes and a -15 C sleeping bag
- Cash
FAQ About the Everest Three Passes Trek
I know that when I was planning my Everest Three High Passes trek itinerary, I really struggled to find accurate and up-to-date information on the journey. Therefore, this section is dedicated to answering all the questions you may have about tackling this amazing trek.
What are the Three Passes?
The Three passes are Kongma La (5,454 meters), Cho La (5,420 meters), and Renjo La (5,360 meters), which as passes trekkers need to traverse in order to complete the Three Passes Trek in Nepal. These passes offer a much more difficult, yet rewarding challenge as opposed to the mostly over-trafficked Everest Base Camp trek.
How Hard is the Three Passes Trek?
The Three Passes trek is widely considered to be the most difficult trekking route in the Khumbu region. That being said, I believe that the difficulty is somewhat over-hyped. The truth is, anyone with a good level of fitness, basic navigation experience, and a strong will should be able to complete this trek. Of course, carrying a pack makes things a lot more difficult, so make sure to keep it light.
How Long Does the Three Passes Trek Take?
Usually, the Three Passes Trek takes anywhere between 16-21 days, depending on how acclimatized trekkers are and if side trips are planned. This Three Passes trek itinerary follows a 19-day trekking plan, not including the final flight from Lukla on day 20.
More Trekking Resources for the Three Passes
Below I've linked some more essential resources for everyone planning to tackle the Three Passes in Nepal. I used most of these on my treks in the Himalayas but some I discovered in hindsight.
- The Lonely Planet: Trekking in the Nepal Himalaya eBook - Having this guide on a kindle is a great complement to other resources. It includes maps, day-by-day trekking information, and information on towns and teahouses. eBooks on a Kindle are great because it's much lighter.
- A Physical Khumbu Trekking Map - This is essential to have. You can buy one before you get to Nepal, or purchase one in Thamel. Make sure to look for one that includes the Three Passes loop.
- Immigration.gov website - The best source for up-to-date information about park entrance fees and permits.
- Maps.Me App - Has a rough route for the Three Passes. However, it definitely shouldn't be used as a primary source of navigation but can come in handy.
- Understanding of Altitude Sickness - Make sure to read up on AMS and how to minimize risk and exposure. Do your own research and consult a doctor if necessary.
- Travel Insurance - I'd highly recommend travel insurance for any Three Passes trek itinerary. Make sure to read your PDS to see if there are exclusions for trekking above certain altitudes (usually 4,500 m).
")
Three Passes: Trekking Ebook
Since internet connectivity is limited in the Khumbu, I've written a comprehensive trekking e-book to the Three Passes which you can download as an eBook for use on your mobile, tablet, or e-reader.
Sakthi
Friday 1st of May 2026
Just back to England after completing the 3 Passes (-1) trek. Had to abandon Kongma La pass due to bad weather. Glad I took the sensible decision as unfortunately there was a fatally just 2 days after I abandoned the pass.
I want to express my sincere gratitude for the well documented article. I had it saved for offline viewing and it helped me throughout the trek. The photos and the way it was post processed certainly matches to the reality. Thanks for taking the time to document everything as neutral as it is. Times shown are reasonable.
I did post a comment before my trip about advice on renting a sleeping bag. I can now confirm it was one of the best decisions. I rented from Ocean Trekking Gear in KTM for £1 a day! It kept me warm in -20°C and was light enough to carry it without a porter.
Vicki Hunter
Friday 25th of July 2025
Wow, a great informative read, thanks so much. My partner and I are heading to Nepal in November. Mera Peak was always the goal, but I have concern about the cold and altitude, (have been to nearly 6000m a few times, would love the challenge of going higher but worried about how much harder that will be). So I have started thinking of doing the 3 passes instead. I see you have done both, what would you recommend, considering scenery, likelihood of achieving etc. Any advice to help in making my decision would be appreciated.
Anthony
Wednesday 9th of April 2025
Hi and thanks for all the great work you put into your guide! It was very helpful. What month were the photos you posted on here taken? We are going to be hiking it this November and are wondering if we should expect all that snow you had to go through. Thank you!
Keith
Thursday 10th of October 2024
Hi Olly, Great blog of your trek. I am planning to do the trek in May of 2025 with my daughter. We have done Kilimanjaro and some volcanoes in Ecuador over 19,000 feet. What time of year did you do this? What temperatures did you experience?
Olly Gaspar
Thursday 10th of October 2024
Hi Keith,
I've trekked in this region in April, May, September, and October. Both seasons are great for trekking. May typically brings warmer temperatures, especially at lower altitudes, with daytime highs in the 10°C or so range (50°F) at higher elevations, while nights always drop below freezing, especially as you get higher. September and October, being post-monsoon, offer crisp air and clearer skies, but nights can be a bit colder– still not as cold as the summit push on Kilimanjaro in my experience.
Given your experience with high-altitude climbs like Kilimanjaro and Ecuador’s volcanoes, you'll have a solid base for the Three Passes trek and should have no problems. If you’re looking for milder conditions, May is ideal.
Let me know if you have any other questions or need more specifics—happy to help!
Michael
Friday 16th of February 2024
Hi Olly - looks like you updated this in Jan 2024. Is this FOR SURE !?!. That one must have a guide for the entire 3 Passes? Thanks Michael
Olly Gaspar
Friday 16th of February 2024
Hi Michael, I've now updated the post to reflect the latest information regarding the laws on guided and unguided trekking in the Everest Region.
Currently, you do not need a guide– the laws that rolled out do not cover the Everest Region. Some peddlers may try to convince you otherwise. However, the Khumbu Pasanglhamu Rural Municipality have stated that independent trekkers are allowed in Khumbu.
I'll continue to update this blog post and comments to reflect any changes.
Hope that helps